Blueberry cupcakes

I haven't had the time to blog for a bit due to some academic commitments and deadlines and I've been really missing making all those sumptuous food. Well, the semester has finally ended and I can now get back to all that cooking and baking I've been keeping for summer. To celebrate the end of semester, my friends decided to have a coffee and cake party today at their place. Even though they are from Austria and you really don't want to compete against the Austrians in baking, I thought I'll put my baker's hat and bake up some blueberry cupcakes! And the result was this: photo (2)

Ingredients Makes 24

For the batter

All purpose flour- 3 cups Butter- 2 sticks (unsalted) Salt- 1/2 tsp Low fat Buttermilk- 3/4 cup Baking powder- 1 tbsp Fresh blueberry- 1/2 cup pureed Freeze dried blueberry- 1.2 oz (34 grams), blended into a paste in a food processor Eggs- 2 Sugar- 2 cups Lemon zest- 1 tbsp Vanilla extract- 1 tsp

For the frosting

Butter- 1 cup Cream cheese- 8 oz Freeze dried blueberry- 1.2 oz (34 grams), blended into a paste in a food processor Sugar- 2 cups

Method

1. Mix the flour, baking powder, and salt together and keep aside.

photo (16)photo (21)


2. Pulverize the freeze dried blueberries.

photo (20)


photo (19)


You can pulverize the fresh blueberries as well and keep them both aside.

photo (17)

3. Mix together the buttermilk, vanilla extract, and the fresh blueberry puree.

photo (38)

photo (37)


4. In a big bowl, add the softened butter, sugar and lemon zest. I used lemons plucked fresh from a lemon tree and that made a lot of difference. Beat using an electric mixture. Add in eggs, one by one and beat thoroughly. Follow with the pulverized freeze dried blueberries.

photo (15)photo (14)photo (12)photo (13)photo (34)


photo (10)


5. Now mix in the flour and the buttermilk mixtures in batches of three, by alternating between the two. Mix thoroughly and scrape down the bowl to see that all parts get mixed well.

photo (9)


6. Now comes the fun part! Pick up those colorful cupcake liners and place them in the cupcake racks. Scoop the batter and put in the cupcake liners. Preheat the oven till 350 F. Put them in the oven for about 20 minutes. Check using toothpick to see if the insides are done. Take them out and let them cool.

photo (23)photo (29)photo (28)photo


7. While we wait for the cupcakes to bake, let's make the frosting. I'm not so fond of thick frosting, so I made mine a little watery. If you want a slightly thicker icing, just add 2-3 cups more sugar. In a bowl, add the softened butter, cream cheese, and the pulverized freeze dried blueberries. Beat a little and then add in the 2 cups of sugar. Beat till creamy.

photo (26)photo (25)


8. By the time this gets done, the cupcakes should be ready. So let's go get them out of the oven!

photo (27)


Don't they look delicious? Now, let's frost them and decorate them and then munch on them :)

photo (24)photo (3)

Vegetarian Burrito!!

I seem to be on a burrito trippage. S really loves Mexican food. He starts drooling over nachos and ahem, subway :) So, I do try to make Mexican food time and again. I love making nachos. They are so healthy when you make them at home by substituting all the right ingredients. But today, I decided to make a burrito which I've been wanting to make for a while now. You will probably have some, if not most of the items lying around in your fridge, and hey! the best part about the burrito is, if you don't have an item which I'm going to say you need, you can just skip it! Really all you need for a burrito is some tortillas, beans and some kind of filling. Here is a way to make the burrito a little bit more interesting! Ingredients Serves 2

Tortilla- 6 numbers Refried beans- 1 can (vegetarians: make sure the beans is not cooked in pork broth) Vegetable broth- 1/2 cup Hot sauce- 2 tsp Lemon- 1 Cumin- 1 tsp Minced garlic- 1 tsp Onion- 1 diced Tomato- 1 diced Jalapenos- 2 diced Cilantro- a bunch, chopped Avocado- 2 Cheese- to garnish (I used cheddar, you can use feta as well) Olives stuffed with pimiento- about 10, chopped Salt

Optional Sour cream Romaine lettuce

Method

1. Chop onions, jalapenos, and tomato. First, we will make the guacamole. Take half of the chopped onions, half of the jalapenos, mix them together in a bowl, squeeze the lemon juice over them, season with salt and keep aside.

photo7

photo6


photo8

2. Next up, we'll make the refried beans sauce. In a pot, add the refried beans, veggie broth, hot saunce, and cumin powder. Let this warm up on Medium-low. This should take about ten minutes, the same time as the step 1 should take.  I used:

photo1


photo2


photo3

photo4

3. Now, we will make the salsa. This one is simple. Take the other half of the chopped onions, jalapenos, the diced tomatoes. Mix them up. Add chopped cilantro. Season with salt.

photo11

photo10

4. Next up, heating up the tortillas. Heat up a skillet, put the tortilla on it. It should take about a minute for each side to get warmed up.

photo13


5. Now, add the ripe avocados to the guacamole, and mash it all together. My avocados weren't so ripe (I probably put them in the fridge, which I shouldn't have!), but the riper, the better. Chop up the olives and keep aside.

photo15

photo12

6. Yippie! now it is time to make the burrito. Take a tortilla, spread the refried beans sauce in the center. Sprinkle cheese on top. Top up with guacamole, then salsa. Now, if using the romaine lettuce and sour cream, add those. Then, garnish with chopped olives. Roll it up, munch away.

photo16

photo17

photo18

photo19

Wash it all away with a glass of Pinot grigio or merlot! Cheers!

photo20


Flavors of East India: Bengal

India is well known for its varied cultural heritage. Among the different languages, different cultures, we are also very proud of our different cuisines. Every state of India has a very vibrant love of food and culinary inkling. One such state, which I'm exceptionally fond of for many, many reasons, is Bengal. The Bengali lives to eat. My aunt who moved to Kolkatta from Delhi a couple of months ago told me how amazing the food is. My love for Bengali food began way back in 2005 in Hyderabad. There is a Bengali Samiti associated with the RamKrishna Mutt there. They had a kitchen which served lunch and dinner, Bengali style. I used to flip for the aloo bhaja and poshto. So yummy! This Bengali connection continued into LA, my colleagues are Bengali, my friends are Bengali. Once, my colleagues and I were heading to San Francisco for a weekend and I was staying over the night with them. One of my colleague's husband made this amazing dish called 'Dimer Dalna'  (Bengali egg curry with potato, yes, they do love potato :)) Ever since I ate the curry that night, I have been wanting to make some in my kitchen. Last week, S and me had been lazy to get groceries and so I finally embarked on making 'Dimer Dalna'. The outcome: pure deliciousness. photo (4)


Dimer Dalna (Bengali style egg curry with potato) Serves 2

Ingredients

Eggs- 4 (boiled and peeled) Potato- 1 (boiled, cubed) Tomato- 1 Onion- 1 Ginger-garlic paste- 1 tbsp Turmeric powder- 1 tsp Red chilli powder- 1 tsp (or 2) Coriander powder- 1 tsp Garam masala powder- 1/2 tsp

Whole spices Cloves- 2 Cardamom- 3 pods Cinnamon- 1 inch stick

Oil- 1 tbsp

Method

1. Boil the eggs and the potato with a little bit of salt till done.

photo (15) 2. In the meantime , make the onion into a paste. After peeling the onion, cut into long pieces and fry in a little bit of oil. This takes away the raw and bitter taste. Let this cool and blend it into a paste.

photo (13)

photo (14)

3. Mix together turmeric, red chilli powder, and salt with a little bit of water. Once the egg is peeled off its shell, make criss cross marks on it using a knife. Smear the paste on the eggs and keep aside. Heat a little bit of oil and fry the eggs and the potato till golden. Keep aside.

photo


photo (11)

photo (18) - Copy

photo (12)


4. Heat the remaining oil. When oil is heated, add in the whole spices. Once they start to splutter, add in the onion paste. Saute for a while till the rawness of the onion goes away. Add the ginger-garlic paste. Then, add the coriander powder, some more chilli powder (if using). Now, add the chopped tomato. Add salt. Mix nicely.

photo (17) - Copy


photo (10)

5. Once the tomatoes turn mushy, add in the eggs and the potato. Mix thoroughly and add in 1.5 cups of water. Cover and let this cook for about 7 minutes. Just before switching off the stove, sprinkle garam masala on top and garnish with coriander leaves.

photo (3)

photo (8)


photo (9)

I served this hot with rotis, a side of salad, roasted green beans, and some left over masoor dal.

photo (16)

photo (6)


A dinner for four

I love having people over to my house for food. I guess it is part of my Indian upbringing. A good part of my growing up years has seen my mom meticulously preparing meals for relatives, friends, guests who have been invited to be a part of the big Indian eating tradition. Even today at home, a meal is not complete unless it is a feast. Curries will be served piping hot, accompanied by a side of dry vegetables, rice and yogurt. You grow up having this notion of meal-hood :) Even after moving to LA, that part of me hasn't changed.

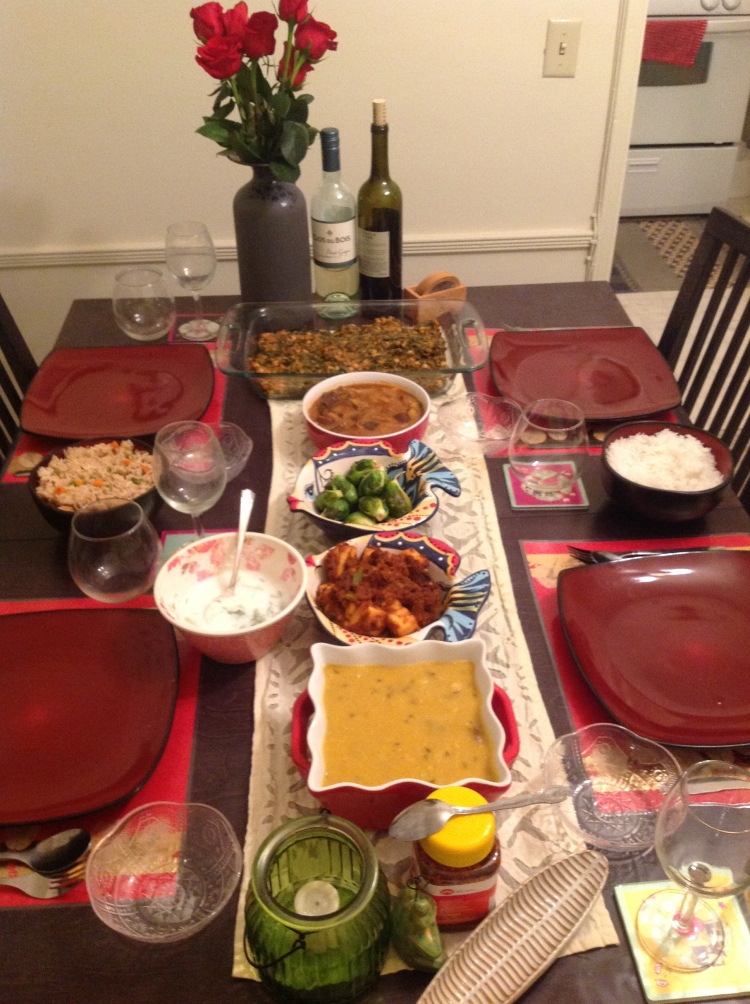
S and me had some guests over on friday, and I cooked up a meal for four in 2.5 hours. This is what the spread looked like.

photo


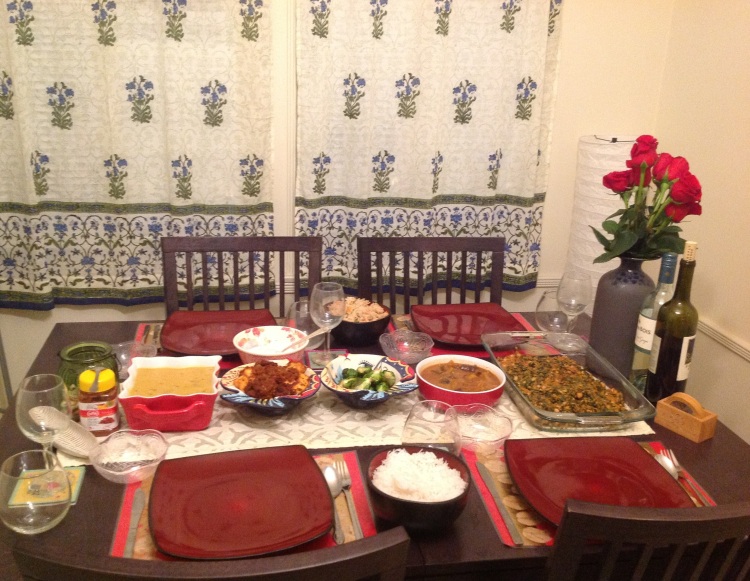
While you are busy admiring my pretty FabIndia curtains, let me give you a run down of the dinner spread (from L-R): Mango thokku pickle (red jar with yellow lid, bought from India Sweets and Spices, Glendale), masoor dal with tadka, kadai paneer, roasted brussel sprouts, baingan vindaloo, espinacas con garbanzo, a side of white rice, vegetable biriyani, and cucumber-dil raita (and some garlic naan and rotis, which I forgot to photograph). So, I made all these in 2.5 hours which obviously means I multitasked and hence forgot to take photographs while making each of the items. You obviously don't want to see my super messy kitchen too :) But, you probably want to make some or all of the items for dinner or lunch, hence, I will provide the recipe's below (apologies for the lack of photos, I promise I'll take some next time).

Recipe 1: Masoor dal tadka

photo (1)


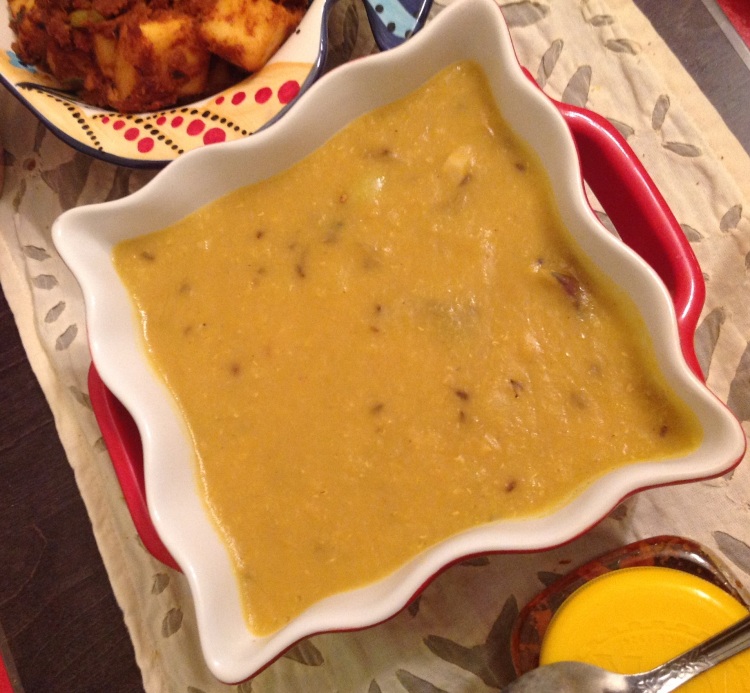
Dal is the easiest thing to make. But not necessarily the quickest thing to make. So start with the dal first.

Ingredients Serves 4

Masoor dal      1 cup (washed) Onion                 1 cup (sliced) Red chilli          2-3 Cumin seeds   1 tsp Potato               1 (peeled and cubed) Turmeric powder  2 tsp Asafoetida        a pinch Salt                      to taste Oil                        1 tbsp

In a pressure cooker (if you don't have one, you can use a saucepan), add the masoor dal, turmeric powder, potato, salt and add water (1: 1). If using pressure cooker, cook for three whistles. If using saucepan, cook for about ten mts. In a skillet, heat oil and add cumin seeds. Next, add the red chillis and onions. Saute for 3 minutes. Add hing. Take off fire and pour the contents into the cooked dal. Check for consistency, if the water is too much boil the dal for 5 minutes. Garnish with cilantro leaves. This can be served hot with rice or roti.

Recipe2: Kadai Paneer

photo (2)

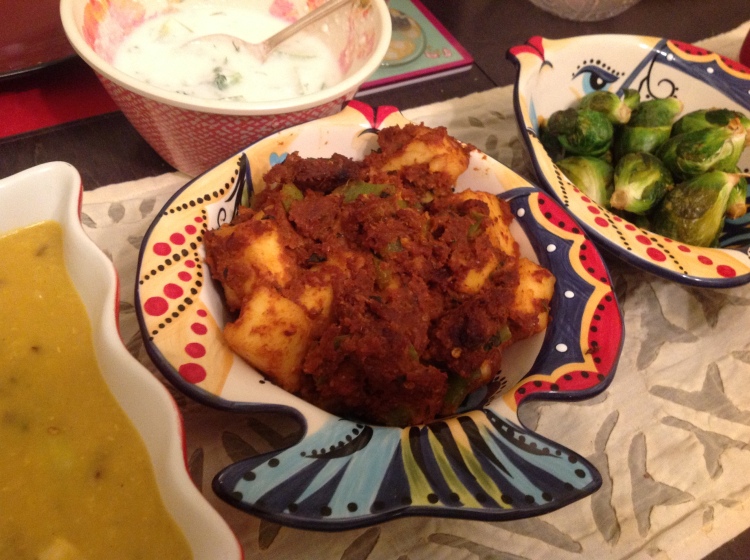
While the dal is getting cooked in the pressure cooker, you can start working on this yummy looking paneer dish. S loves anything made with paneer. So, I do experiment quite a bit with it. This one though is easy to make and the dish will be loved by your guests.

Ingredients

Paneer (Indian cottage cheese)   1 cup Capsicum                                               1 (cut into squares) Onion                                                       1 (cut into squares) Tomato                                                   3 (pureed) Ginger-garlic paste                            1 tbsp Fenugreek leaves dried                    2 tsp Turmeric powder                                1 tsp Coriander powder                               1 tsp Red chilli powder                                1 tsp Salt                                                            to taste Oil                                                              2 tbsp

Whole spices Cinnamon                                              1 inch stick (broken into smaller pieces) Cardamom                                            2 Cloves                                                     4 Dry red chillies                                   2 (broken into smaller pieces) Bay leaf                                                  2 (broken into smaller pieces) Cumin seeds                                        1 tsp

Method

1. Cut the paneer, capsicum (bell pepper), tomato and onion into squares. Puree the tomato in a blender. Keep aside. 2. Heat oil, add the whole spices and roast for 2 minutes. Add onions, ginger-garlic paste, and saute till the onions turn translucent. 3. Add the tomato puree, salt and let it boil for 2 minutes. 4. Add capsicum, red chilli powder, turmeric powder, coriander powder, a little water and let is boil. 5. Add the paneer, and the fenugreek leaves. 6. Let this cook for about 8 minutes and serve garnished with cilantro leaves.

Recipe 3: Vegetable biriyani

photo

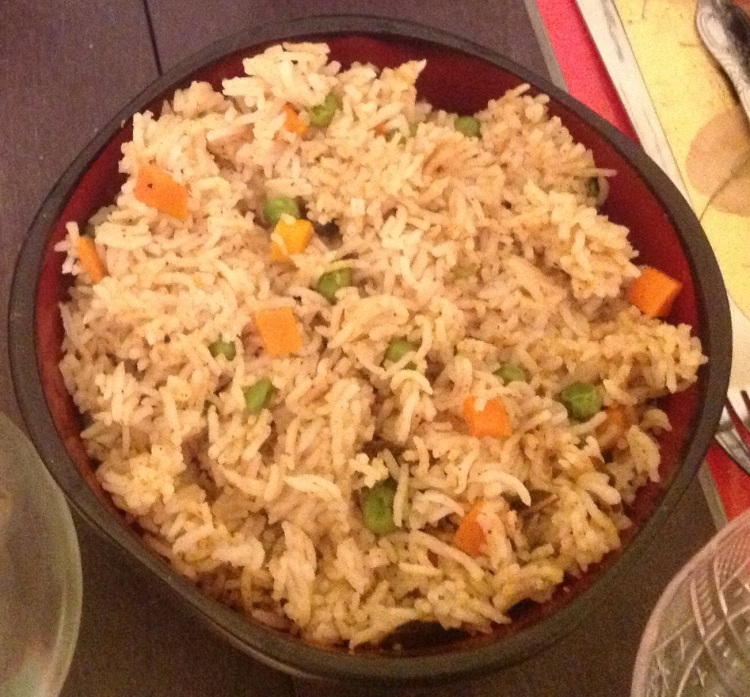
This is a very easy side to make. A difference from the usual white rice accompaniment to Indian food, which I also served by the way.

Ingredients

White basmati rice                4 cups Peas                                             1/2 cup Carrot                                         1/2 cup Onions                                        1 Biriyani mix                             2 tbsp Salt                                               to taste Ghee                                            1.5 tbsp

Whole spices Bay leaf                                     2 Cardamom                               2 Cinnamon                                 1 inch stick Cloves                                        4 Black pepper                           4

Method

1. Soak the rice in water and little salt for at least an hour before cooking it. I soaked the rice first, before I started to make the dal. 2. In a pan, heat the ghee and fry the whole spices. Now add the onions and fry till translucent. 3. Add the peas and carrots and mix well. 4. Add the salt, and the biriyani mix. 5. Add in the rice, mix everything well. Add in water to cover the rice and let it boil. Once the rice is ready, serve hot.

Recipe 4: Roasted brussel sprouts

photo (3)

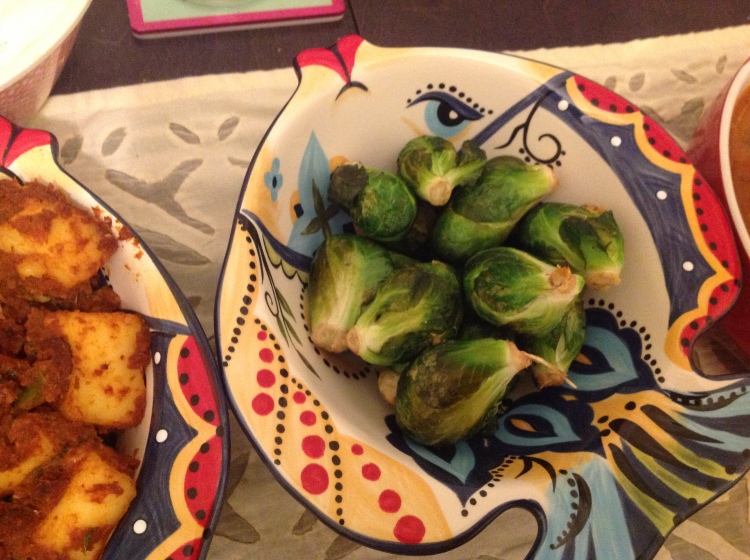
S doesn't like brussell sprouts. But I love them. So, I'm always looking for interesting ways to make them yummy. Roasting them is by far my favorite way of devouring brussell sprouts.

Ingredients

Brussell sprouts                   1 cup Lemon juice                           2 tbsp Garlic                                        1 tsp (minced) Salt                                             a pinch Olive oil                                    1 tsp

Method

1. Preheat the oven to 350F. 2. In a small bowl, mix the minced garlic with the lemon juice and salt. 3. Spread the brussell sprouts in a oven friendly baking dish and sprinkle the mix prepared. Coat the sprouts nicely. 4. Pour some olive oil on top of the sprouts. 5. Roast them in the preheated oven for about 25 minutes, turning them over at least once in between.

Recipe 5: Cucumber and dil raita

photo (1)

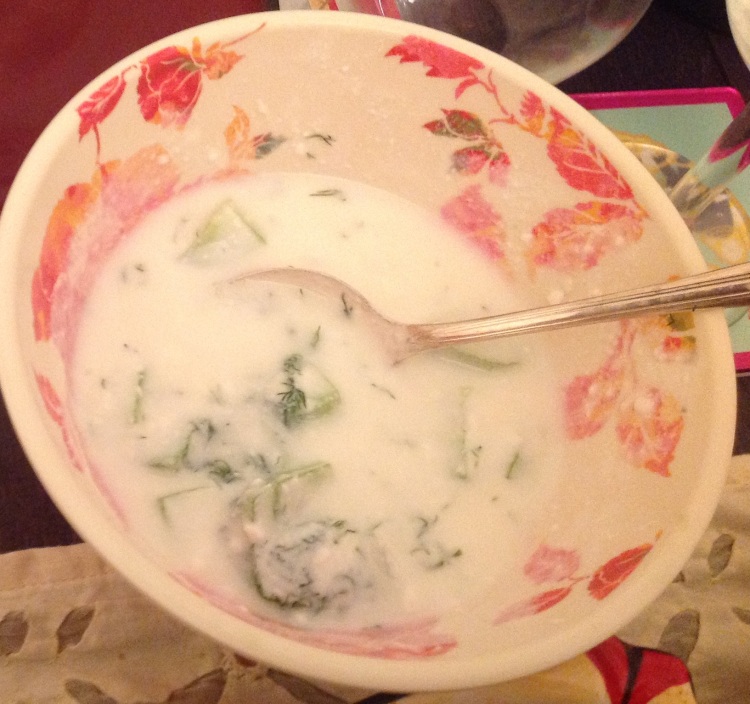
Last but not the least, serve the food with a delicious raita. Cut some cucumbers, mash it with some dil and dunk it into yogurt, sprinkle in a little salt, whip it up and serve.

photo (4)


And there you go, a simple Indian meal for four is ready. I also made two other dishes, eggplant vindaloo and garbanzo beans with spinach (also called espinacas con garbanzo) but those recipes will have to wait for another occasion! I also served a side of mango thokku pickle (bought from India sweets and spices, Glendale).

To finish it off, my guests dug into this Rava Kesari and a slice of this cheesecake.


Kotthu roti

There are days when you still want to eat healthy but you are just too tired to spend more than ten minutes making dinner. Today was one such day. That's when I decided to make 'Kotthu roti'. There are different avatars of this dish which originated among the Tamil people in Sri Lanka. The one I made today is the simplest of all. photo (8)

Recipe: Kotthu roti

Ingredients Serves 2

Roti                   6 numbers Onion               1 cup Green chilli    2-3 Eggs                  3 Minced garlic 1 tsp Oil                       1 tbsp Curry leaf        1 sprig Red chilli         2-3 Salt

Method

1. Make the rotis on a flat skillet.

photo (4)


Once you are done with the 6 rotis, stack them up and cut them into thin, long strips.

photo (6)


2. In a saucepan, heat oil and add the onions and green chillies.

photo (3)

3. Once the onions begin to brown, add the curry leaf, red chilli, and minced garlic.

photo (5)


4. Saute for a couple of minutes, and add the eggs.

photo (7)


5. Scramble them, add the roti and mix well. Add in salt.

photo (8)


This dish can be served as a tea time snack, or as a light dinner along with a red kidney bean curry as accompaniment.

Spring bake!

One of the perks of being a graduate student is the number of "extra" holidays one gets. These are school holidays, such as spring break in March! and boy, do I love spring break. It is the time where I can afford some spring cleaning in the truest sense and get down to starting many things on my always-brimming-to-the-full to-do list, like this food blog for instance. Being on spring break also gets me more time to experiment with my culinary instincts. I've been cooking regularly but yesterday I decided to put on my baking hat. From my childhood I have been fascinated with baking, in fact, the first cooking class I ever went to was a baking class by Sevanti Jayaratnam. She baked these amazing, gorgeous, beautiful cakes. I had eaten one of her cakes for my 13th birthday and I was hellbent on attending her baking class that summer. I learnt so much from her class, the basics of baking, the importance of timing and consistency, and some tips and tricks to get that cake in your oven to look and taste the best. When I grew up, however, I was more interested in the cooking side of things. I did bake occasionally, but having access to baking goods, an oven were things I did not have during my long hostel stint in my graduation days. The last couple of years have only seen me bake the chocolate cakes and banana cakes, so when I baked this new york cheesecake yesterday I was apprehensive about how it would turn out. First verdict: not bad, second verdict: yum, yum, yum :)

photo (3)Who doesn't love a classic NY cheesecake? I do, and I'm sure you do too. So, here is the recipe if you want to whip one up for your loved one.

Recipe: New York Cheesecake with cherry topping serves 4+

Ingredients

for the sauce (optional) Cherries                  16 oz       (I used Maschino cherries, but you can use fresh ones too) Sugar                       1/4 cup Lemon juice         2 tbsp Corn flour             2 tbsp       (mixed into a paste with a little water)

for the cheesecake Cream cheese         5                (I used philadelphia cream cheese) Vanilla essence     1 tsp Sugar                         1 3/4 cup Eggs                           5 large Yolk                           2 All purpose flour 3 tbps Lemon zest             1 tsp          (I used freshly plucked lemons from my friend's garden) Orange zest             1 tsp

for the crust Graham crackers   18 oz or 15 sheets of crackers   (I used Honey maid) Butter, unsalted      4 oz  or 1 stick                                  (I used lucerne) Sugar                           1/2 cup Salt                               1/4 tsp salt

gadgets Food processor 9 1/2 inch springform pan Baking plate Grater

Preparation

The first golden rule of baking cheesecake (or any cake for that matter) is to bring all the ingredients to room temperature. Pull out the eggs, butter, cream cheese, lemon, orange, vanilla essence from the fridge. Let these come to room temperature. I can't stress how important it is to do this. You don't want to end up with a clumped up cheesecake, so put aside ample time for ingredients to come to room temperature. Wash the eggs and pat dry them. Remember, not even the tiniest amount of water in your baking.

photo (4)Preparing the crust

First step, let's get started with the crust. The best part of the cheesecake is the crust. So yum and crunchy. Take the graham crackers and finely ground them. I started mistakenly by thinking I can grind them with my own hands, wrong, very wrong. You won't be able to grind them finely. After the unsuccessful attempt, I tried to grind them using a masher (I believe a muddler would work just as well). This worked a little bit better than my own hands, but not by a whole margin. Finally, I just dumped everything into my food processor, and voila, the graham crackers were ground in a jiffy. After this, melt the butter on stove top and mix this thoroughly with the finely ground graham crackers. Mix in the sugar and the salt. Mix everything together. Grease a 9 1/2 inch springform pan with butter and stick the crust on it, first the bottom of the pan and then the sides of the pan. You can also put the mixture in the freezer to set before greasing the pan. I did put it in the freezer and then pull it out just as I was ready to put the cheesecake into the oven. Keep the pan aside while you prepare the batter.

[gallery ids="31,32,34,35"]

Preparing the cheesecake batter

This is the part I love, making that goey, oh so yummy batter, the core of the cake. Take the cream cheese, transfer them into a bowl. Using an electric mixer, beat the cream cheese. Remember before this step, make sure your cream cheese is at room temperature. After you have swirled around a little bit, add sugar and mix thoroughly. Next, add the flour. In between, use a spoon to make sure everything is getting mixed evenly. Add the vanilla essence, beat once. Now add the 5 eggs, one by one, mixing thoroughly, followed by the 2 egg yolks. Ensure that the mixture is even. Now, grate the lemon and orange using the grater. Add these one by one to the mixture and beat again. Next, take the greased pan with the crust and pour this mixture into it. The batter will cover the entire pan.

[gallery type="square" ids="39,40,41"]

Baking

Preheat the oven till 475 F. Since I used a teflon coated nordic ware, sprinform pan, I started baking at 475 F. This is because the maximum temperature withstood by non stick is 475. You can go upto 550 F if you are using some other baking pan. At 475F, bake the cheesecake in the center of the oven till the top starts browning. This depends on your oven, but approximately should take 10-15 mts. Keep eyeballing your oven, because you don't want the cake to brown too fast. Once it browns and rises slightly, lower down the temperature to 200F and continue to bake for another hour or until it is set. To test whether your cake is baked, tap the side of your pan with a spoon. If the cake wiggles as one semi solid body, you are done baking. If it wobbles too much and still feels too liquidy in the middle, continue baking. Remember, it is okay that the center of the cake is wobbly. It will set when you put the cake in the fridge. Take out the cake and let it cool to room temperature. Put it in the freezer for at least 6 hours, the longer the better.

photo (12)

Preparing the sauce

While the cake is setting in the fridge, prepare the sauce and keep it aside. In a saucepan, bring the cherries, sugar, lemon juice, and corn starch to a boil. Let it boil for 3 minutes or so. Cool to room temperature.

Once the cake has been set (I left it in the fridge for 8+ hours), open the side of the pan. Now pour the sauce all over the top. Devour immediately or keep chilled and slowly devour it for about six days. Call your friends over for some tea and cake, trust me, they won't be disappointed :)

[gallery type="square" ids="44,45,46"]

Welcome and all that!

I have always wanted to blog about food, I mean who doesn't want to blog about food. It is the single most delicious part of our day to day existence. We consume food, lots of it, all kinds of it. You can even think of yourself in terms of the food you consume, for example, my (sigh) muffin top (thanks pizza!). The last year and half I blogged a little bit about food here. It was still pretty much work in progress because hey, being a graduate student living in expensive Los Angeles, I didn't have a full fledged kitchen. Well, I am still a graduate student living in expensive LA but I now have a sort of workable, bloggable kitchen (thanks marriage!). Cooking for two people instead of your own hungry belly is, I think, worth the effort of blogging. When I used to live alone, food used to be prepared in bulk. Lentil curry (dal) would easily last for 3 days in the fridge, and the microwave spoiled me to bits. This was of course not blog worthy. It was only the occasional, more effortful recipes that made it to my previous food blog. So this new blog here is from my new kitchen. Hope you enjoy making these recipes, because after all food blogging is all about sharing, creating new delicious, yummilicious food, and keeping your tummy happy. Looking forward to an exciting journey through the world of food.